It is not an easy task for a website owner to keep its files safe all the time from hackers, content fraud, and others. And always pay extra for backup and restoration of necessary backup files for the developers. But it might be an easy take if you install a backup and restore plugin on your website. And if you are a WordPress website owner then backup and restoring the site can be an easy task because of the awesome WordPress backup plugins which WordPress.org provides.
There are some plugins in the WordPress market that only backup files and for restoration, we need to install another plugin. But the Everest Backup plugin does not just backup the file but also restores the files. Not only this but will get many more features that help you to maintain your business.
Table of contents
Brief introduction of Everest Backup PluginBackup the file using Everest Backup
Schdeule Backup Setting
Restore the file using Everest Backup
First Method
Other method: to restore available file from History
Brief introduction of Everest Backup Plugin
It has a unique feature that helps the ordinary user to understand the process because of the human-readable log. Not only this, but Everest Backup Plugin also restore, migrate/clone, and backup your data with a single click. Furthermore, you can backup files manually or schedule time. It also provides free and premium versions so that you can try the free version first and get the premium ones.
Some features of Everest Backup Plugin:
Cloning and migration: Simply copy and paste the magic link to another domain and migrate within a minute.
Fast, personal support: Provides expert help and support from the developers whenever you are in need.
Network / multisite: Besides standard single sites, Everest Backup supports multisite network backup & migration.
Backup time and scheduling: Set the time to backup, restore, or delete the data and let the system do the job.
Let’s discuss how to backup and restore the WordPress website using Everest Backup Plugin.
Backup the file using Everest Backup
In the Everest Backup plugin, you will get two options to backup your file
- Manual backup
- Scheduled backup.
We will discuss it one by one here.
Manual Backup using Everest Backup Plugin
By default, we select the entire file which is shown in “What to backup?”.
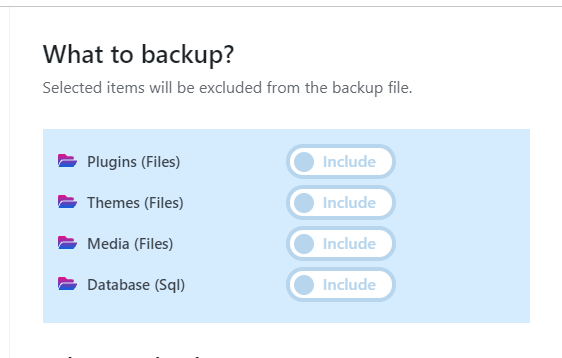
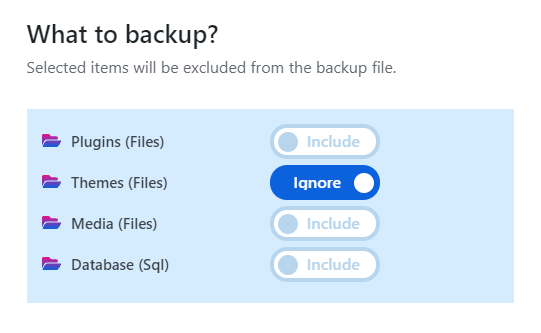
You can ignore which file you don’t want to back up, for that, select what not to backup (plugins, themes, media, or database).
Choose the server where to store the backup file. In the beginning, you will see “Local Web Server” to store your backup file. So click on the dropdown and you will get other server options like Google Drive. So you can select any of them to store the backed-up file.
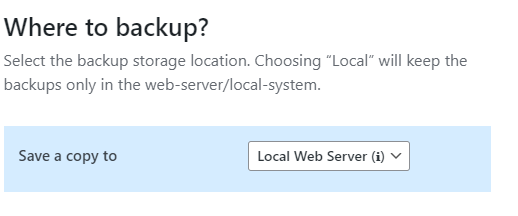
Local Web Server is default but we don’t recommend you to save your backup file in it. Because if your local server crash then all your data will be destroyed.
That’s why we recommend you use cloud services to save your backup file. There are many cloud servers you will find, among them “Google Drive” is our addon cloud server. So you can store your backup file in Google Drive, which you will find in our “Addon” tab.
The main benefit of storing backed-up files in a cloud server is you can get the backed-up file from anywhere if you are connected to the internet.
To know more about installing Google Drive in your Everest Backup Plugin, go to “Everest Backup Google Drive“.
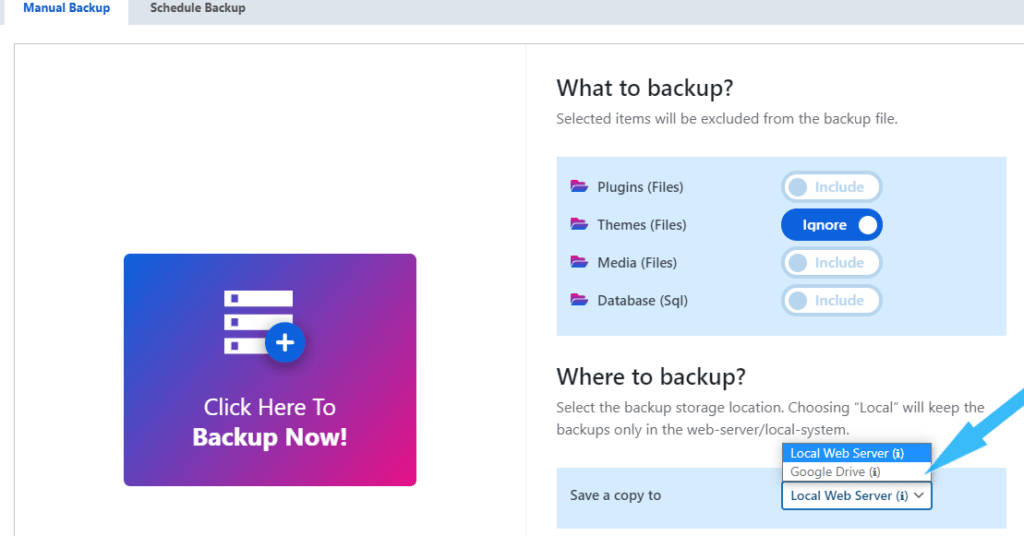
Click on backup now. Click on download.
It takes a few seconds to download and the time taken will depend on your file size and the Internet Speed. After completion, a popup dialogue box will appear from where you can Download the File and Generate a Migration Key to migrate the file from one website to another or one server to another.
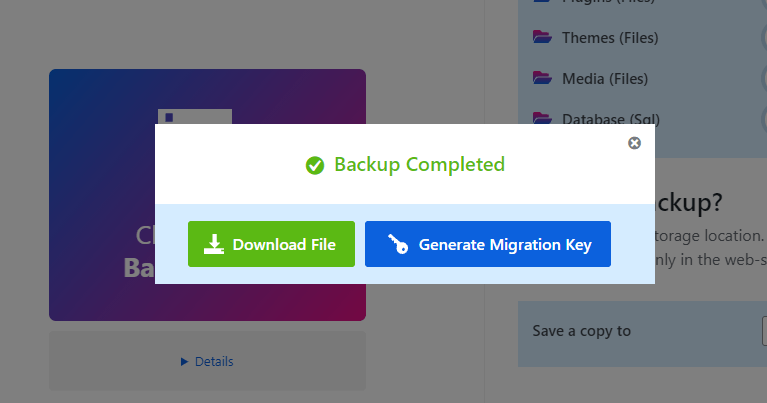
You can click on “Details” to get information about at what time your backup started, disk size, when the backup was completed, how much time it took to backup, the size of your backup file, and the status of whether your file is backup or not. With the help of this Human Readable Log, you will know what is happening back on your website.
Or you can go to the History tab of Everest Backup Plugin where you will see the list of files with their size and date of creation.
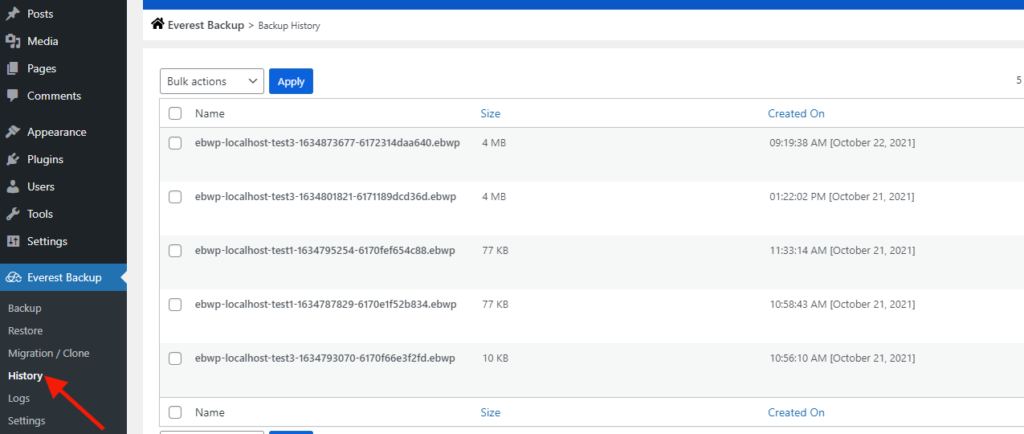
Since, your files are backed up successfully, no need to worry about data fraud or anything. Because you can easily restore the backed-up file.
Schedule Backup using Everest Backup Plugin
First, enable the scheduled backup, by default it will be disabled.
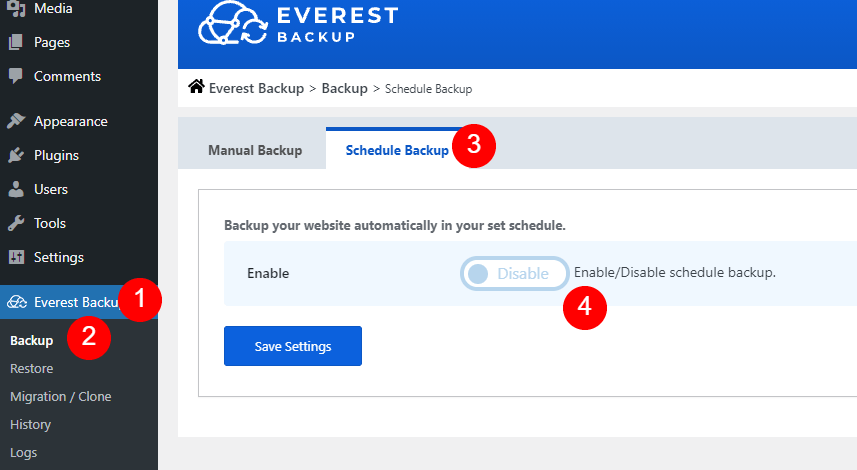
Schdeule Backup Setting
Set the Cron Cycle to run periodically at a fixed time to backup. Choose the server to save the backup file.
By default, you will get the “Local Web Server” option to save your file but we don’t recommend you to save your backup file there. Because if your local server crash then all your data will be destroyed.
That’s why we recommend you use cloud services to save your backup file. There are many cloud servers you will find, among them “Google Drive” is our addon cloud server. So you can store your backup file in Google Drive, which you will find in our “Addon” tab.
To know more about installing Google Drive in your Everest Backup Plugin, go to “Everest Backup Google Drive“. Select what to backup( plugins, themes, media, and database).
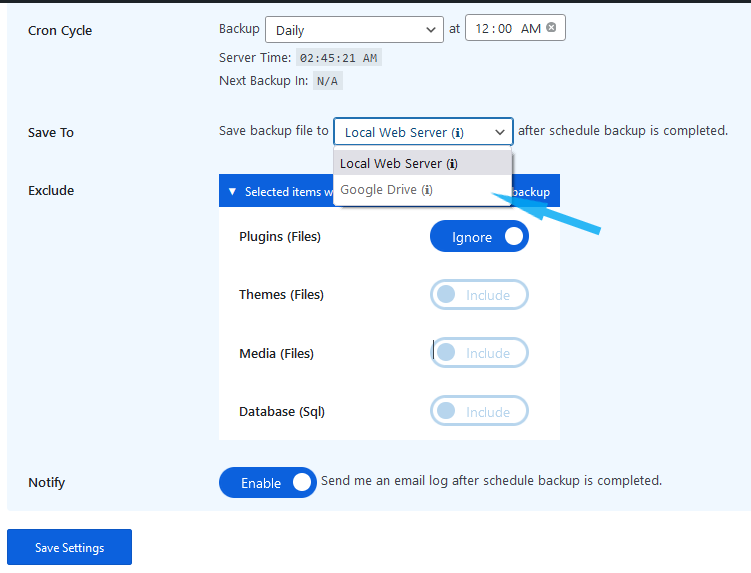
Enable Notify so that you will get an email log once the scheduled backup is complete. If you don’t enable the email, it won’t send you a status email. So better enable it. Save the setting. According to the time you have set, location, and selected items will be backup. You will be notified once it is completed.
Now no need to worry about any data fraud, hacking, server faults, or other reasons. Furthermore, having a complete backup of your website, including files and databases, will save you from losing years of hard work.
Restore the file using Everest Backup
Like in the Backup section, the restore section also has two ways to restore the files. The first way, you go to the Everest Backup Menu and then click on Restore. There you will get two options: Upload File and Available Files. Another is you can restore from the Everest Backup History section.
First Method
Upload File using Everest Backup Plugin
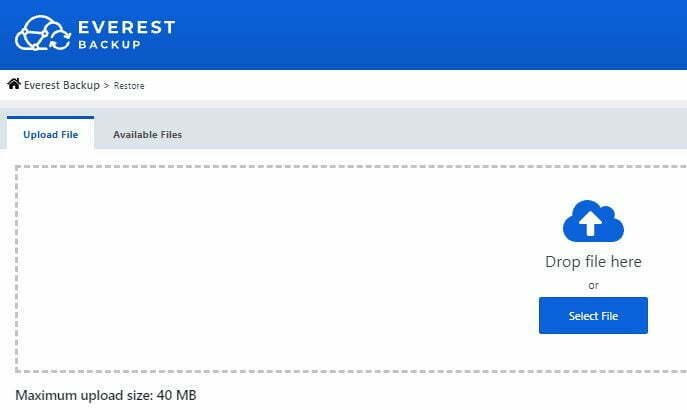
You will see the Drop file here or the Select File.
You can restore your backup file in the cloud server then you can drop a file from there or simply select a file from your “Local Web Server”.
The uploaded file must be in .ebwp format and its maximum size is 300MB. If not then contact your server or you can get our premium Everest Backup Plugin, where we provide unlimited size.
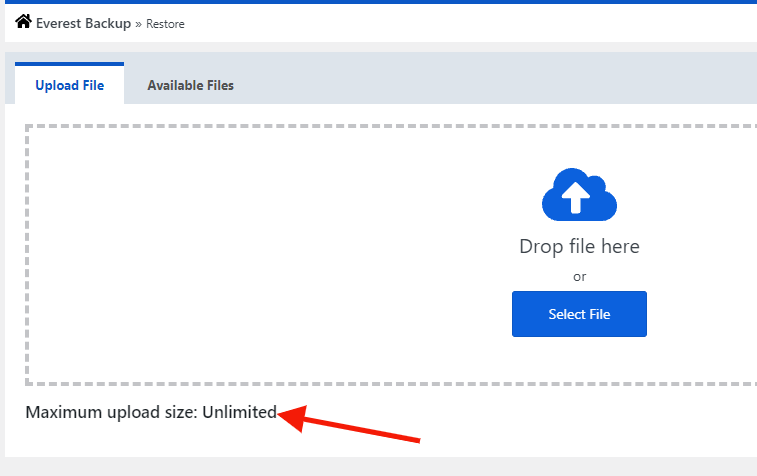
If you are not connected with any cloud server, then learn how to connect with a cloud server from:
Everest Backup Google Drive.
Once you select the file it will automatically restore. It will take some time according to the file size and your internet speed.
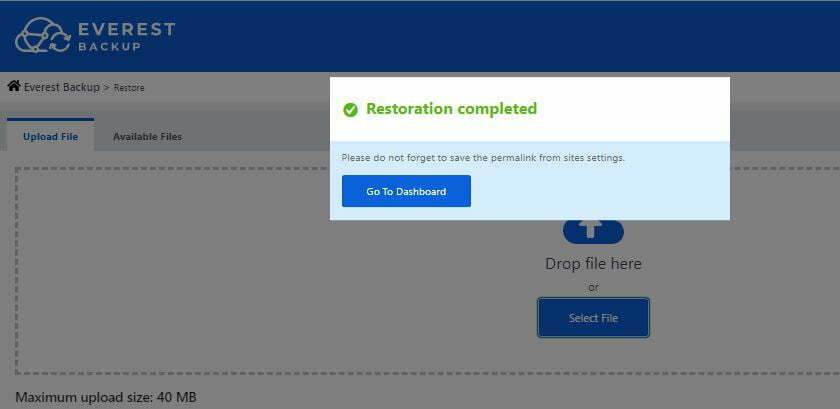
After completion of the restore, click on Go To Dashboard you will go to the Login page.
Let’s say the username and password of our website be
Username: Test1
Password: Test1_Test1
And the file username and password, which we restore recently be
Username: Test2
Password: Test2_Test2
Log in with the username and password of the file which is restored.
To log in to the dashboard using
Username: Test2
Password: Test2_Test2
Then you will be directed to the website dashboard.
For confirmation, you go to the Everest Backup menu and select log where you will see the file with its type i.e., Rollback. It means the available file in Log is a restored file. You can click on the dropdown to see the Human Readable Log and get back information about your system.
Available Files using Everest Backup Plugin
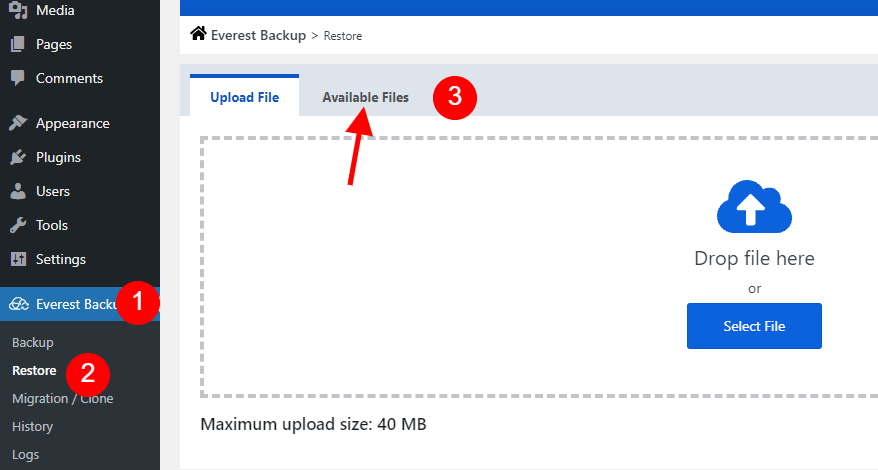
Go to Available files then check if the file, which you want to restore is available or not.
You can select the file from the cloud server also if any of the addons are installed and activated in the Everest Backup Plugin. If you haven’t then go to install addons in Everest Backup Plugin. If yes, click on restore.
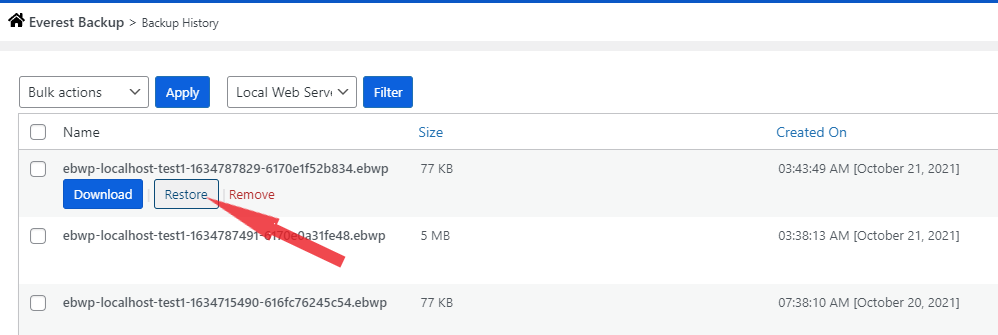
Click on Rollback. After some time, it will be restored. The time taken to restore will depend on the file size and your internet speed.
After completion of the restore, you will go to the Login page.
Let’s say the username and password of our website be
Username: Test1
Password: Test1_Test1
And the file username and password, which we restore recently be
Username: Test2
Password: Test2_Test2
Log in with the username and password of the file which is restored.
To log in to the dashboard using
Username: Test2
Password: Test2_Test2
Then you will be directed to the Everest Backup Plugin Log section, where you will see the file with its type i.e., Rollback. It means the available file in Log is a restored file. You can click on the dropdown to see the Human Readable Log and get back information about your system.
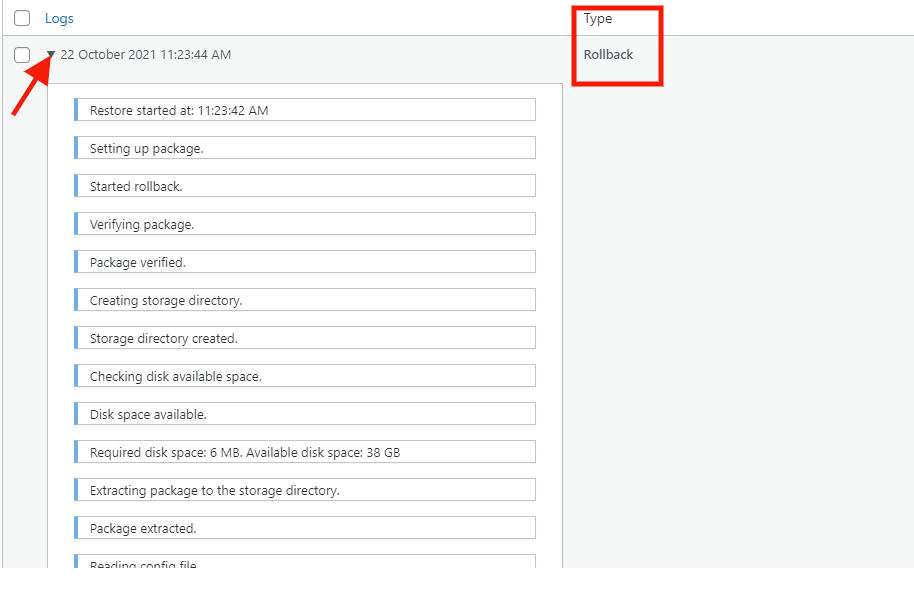
When you restore the backup file, it overwrites and erases any material and settings made beyond a certain point, potentially failing content and settings. So check the backup file before restoring the file to the website. It will take some time to completely restore the data on your site ranging in your file size.
Other methods: to restore the available files from History
Go to Everest Backup Menu, where you will see History. Click on history, there you will get the list of files with their size and date of creation. Choose and click on one file.

In the filter tab of Backup History, you will see the list of servers like “Local Web Server”, and “Everest Backup Google Drive“. If you have backed up files there using Everest Backup Plugin then, you can directly Download, Restore, and Remove the files without login into the cloud server.

Click on Restore and Rollback within a few it will restore.
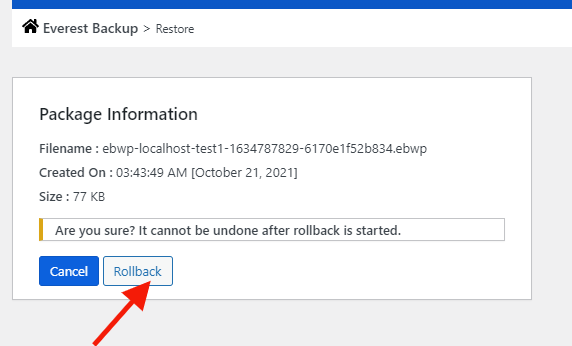
After completion of the restore, you will go to the Login page.
Let’s say the username and password of our website be
Username: Test1
Password: Test1_Test1
And the file username and password, which we restore recently be
Username: Test2
Password: Test2_Test2
Log in with the username and password of the file which is restored.
To log in to the dashboard using
Username: Test2
Password: Test2_Test2
Then you will be directed to the Everest Backup Plugin Log section, where you can see the Human Readable Log of the file by clicking on the dropdown.
If you’re worried about losing material when restoring a backup on your site, you can export it first and back it up.
Want to know more about Backup and Restore but are bored with reading the steps then here is a video tutorial for you:
For Manual Backup: https://youtu.be/shOfV5BT7o0?list=PLJ9kDzVp2heF2Qa3Pfe2d8ZrOn60reYIt
For Schedule Backup: https://youtu.be/zUliy2RKSPA?list=PLJ9kDzVp2heF2Qa3Pfe2d8ZrOn60reYIt
For Restore by Uploading: https://youtu.be/BT5D2JUbLDk?list=PLJ9kDzVp2heF2Qa3Pfe2d8ZrOn60reYIt
For Restore by Available files: https://youtu.be/LpcYqR9Fcpk?list=PLJ9kDzVp2heF2Qa3Pfe2d8ZrOn60reYIt
