This documentation will guide you to add cloud addons to Everest Backup Plugin.
We assume that you have already set your timezone in the WordPress website and then installed and activated our Everest Backup Plugin. If you haven’t installed and activated then go to Install Everest Backup Plugin.
Video tutorial
Continue reading to add cloud addons if you prefer written instructions.
Step 1: Open your WordPress website dashboard
Step 2: Go to Everest Backup Menu and select Settings.
Step 3: Go to Cloud. Here you will see ” install our addons to store your backup files on the cloud”.
Step 4: Click on the link and will redirect to the Everest Backup Addons page.
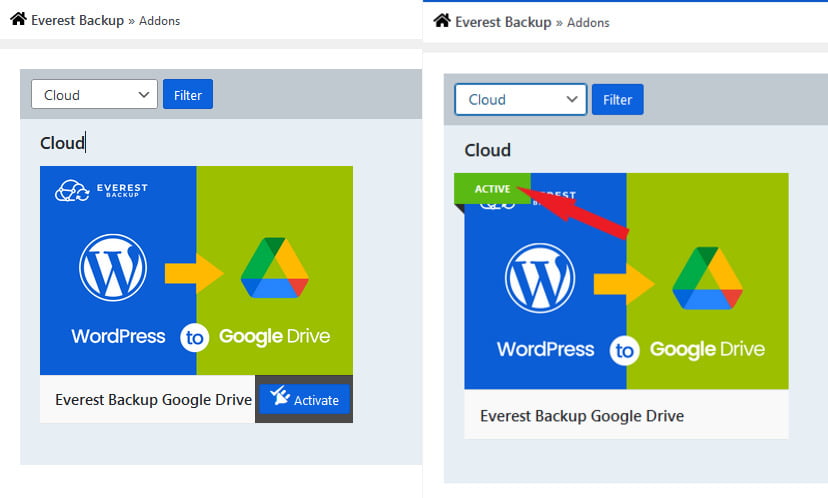
Step 5: Select the cloud category and click on filter.
On this page, you can see a dropdown, where you can select categories and filter. If you choose cloud then it will show the list of cloud addons. Otherwise, it will show the list of other addons concerning the category you select.
Here you will see the list of addons. In that list, you will get both free and premium addons, where free addons can be installed directly.
For now, you can only see “Google Drive” in the list and we are working on integrating other cloud servers.
Google Drive is one of Everest Backup’s most popular cloud storage and Google’s prominent online repositories.
Step 6: Install and active Google Drive
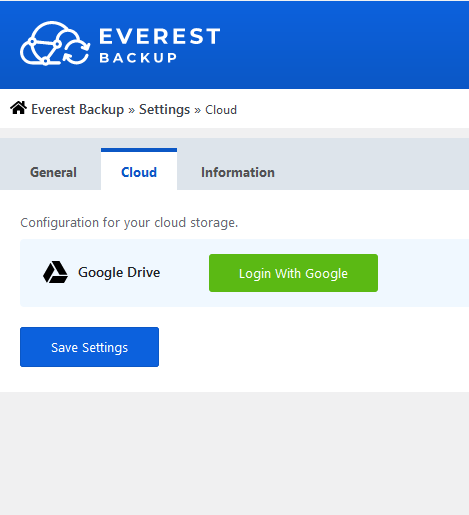
Step 7: Go to Everest Backup menu then settings and then Cloud.
Step 8: Log in with Google. Once you log in with google then set the transfer rate then save the setting.
Additional information
If you set it at slow internet then the files will be transferred into chunks at the rate of 2Mb, and if set at fast internet then it will be transferred at the rate of 10 Mb. So, better to keep in the middle, neither slow nor fast.
Like this, you can also add cloud addons like One Drive, Amazon, Google Cloud, and many more.
Let’s check where you can see the cloud server options
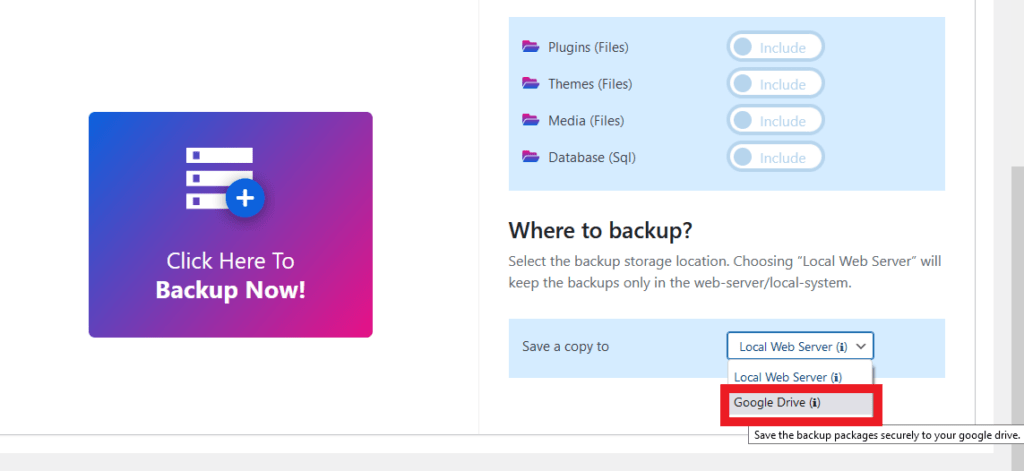
Go to the Everest Backup Backup page:
There you can see the “Google Drive” option in Manual backup and Schedule backup in the “Save a copy to” section after clicking on the dropdown.
That means, Google drive is successfully added to your system and you can save your file directly on Google drive. If you hover on Google Drive for a few seconds it will show you a description “ Save the backup packages securely to your google drive.”
Furthermore, go to the Available section of the Everest Backup Plugin Restore section, you can see the dropdown and click on the dropdown and select “Google Drive” then click on the filter.
Then the list of files that are backed up in the drive will be shown. And if you hover on the file you will get the restore option, like you can roll back the file directly from “Google Drive”. To know more about rollback go to the link below: https://wpeverestbackup.com/how-to-restore-available-files/
In addition, go to Everest Backup History, where you will get a list of files and the dropdown. Click on the dropdown select “Google Drive” and filter it. The list of backed-up files in the drive will be shown.
If you hover around the file, it will give you three options, download, rollback, and remove.
Extra information
You can download the backed-up file without logging into “Google Drive” and restore the file. And if you click on remove then it will automatically remove the file in Google Drive. Likewise, if you delete the backed up file in the “Google Drive”, then it won’t show in the website dashboard history or available restore list.
During this (add cloud addons), if you get any kind of error message then send us an email at bug-report[at]wpeverestbackup. com with the screenshots of the error message, log file, and information about your system. To get information on your system go to Everest Backup Plugin setting, select general, and then information.