Do you think owning a website and installing some plugins is enough? I don’t think so, to get a better result you must maintain your website with the best WordPress Backup Plugin.
I am not gonna talk about what can be done to improve your website? Or how to do it? And where you can find it?
Here I m going to talk about something more important than these questions. i.e; How to secure your website files before it is hacked, data fraud, or content rewrite?
Table of contents
What to look at while choosing the WordPress Backup Plugin?How to check the server info of your WordPress website?
Installing a WordPress Backup Plugin on your website
How to take backup of the website using the WordPress Backup Plugin?
You might have noticed, that when your website is getting a high response, popular among people then you will start to get fraud messages, unnecessary emails, and many more. And a small mistake your website will be hacked or you will lose all your data. Then as a website owner, you can’t do anything except rely on the developer.
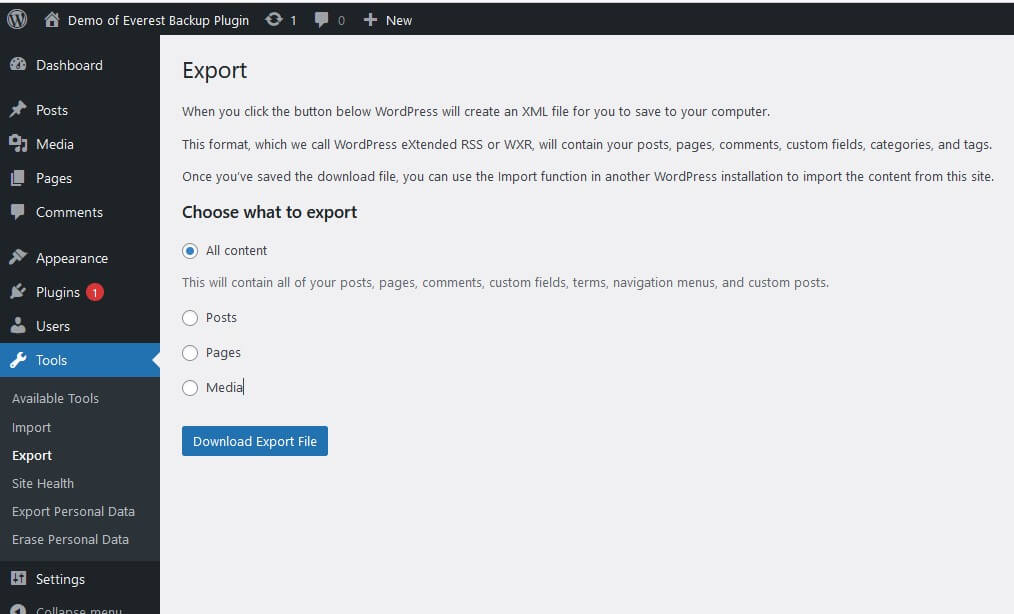
But one thing you can do is install the WordPress Backup Plugin on your WordPress website so that even after your website is hacked or anything bad happens, you will have your backed-up file with you. And it will be somehow easy for you to start again. You won’t lose your years of work if you keep backup. And as a WordPress user, you can backup your contents (your posts, pages, comments, custom fields, terms, navigation menus, and custom posts) without external help. But apart from the contents, there is other stuff too which needs to be backed up. So, you have to install and activate the WordPress backup plugin.
Talking about WordPress Backup Plugins, you will find plenty of them in the WordPress market. It will confuse you and you will be in a dilemma about which to choose, so we start to read reviews and look at their download records. And we choose one of them randomly. Do you think it’s a good decision just by reading reviews or just looking at the rating star?
Sometimes the plugins with good reviews, and high rating stars won’t be suitable for your website and meet your needs. And I’m 100% sure that as a website owner you don’t want to waste your money on some unsuitable plugins. You will search for a plugin that might meet some of your needs.
What to look at while choosing the WordPress Backup Plugin?
When choosing the WordPress Backup Plugins first you must look at
Their features so that you will know
- what kind of facilities you will get if you install this plugin.
- whether it provides updates or not. Because, if the plugin stops updating then I don’t think it will match with the current situation.
- whether it offers paid version as well as a free/ trial version to test. If it doesn’t offer a free version then what’s the point to buy and install this plugin. When you need an expert to understand how it functions. And a small mistake you will lose everything.

Next, look for compatibility
What if this plugin doesn’t match your website’s PHP version, WordPress version, and others. It might rate as 5 stars with great positive reviews and millions of downloads and it won’t work for you. I know some of the plugins which don’t work in the latest versions and your website has all the latest versions of servers. Will you pay for that plugin that is not compatible with your website? I guess, the answer is “No”. So look for a compatible plugin for your website.
How to check the server info of your WordPress website?
You must be wondering how to check without the help of some expert or your website developer. Not to worry, I will tell you. Follow the simple steps below and you will know how to check
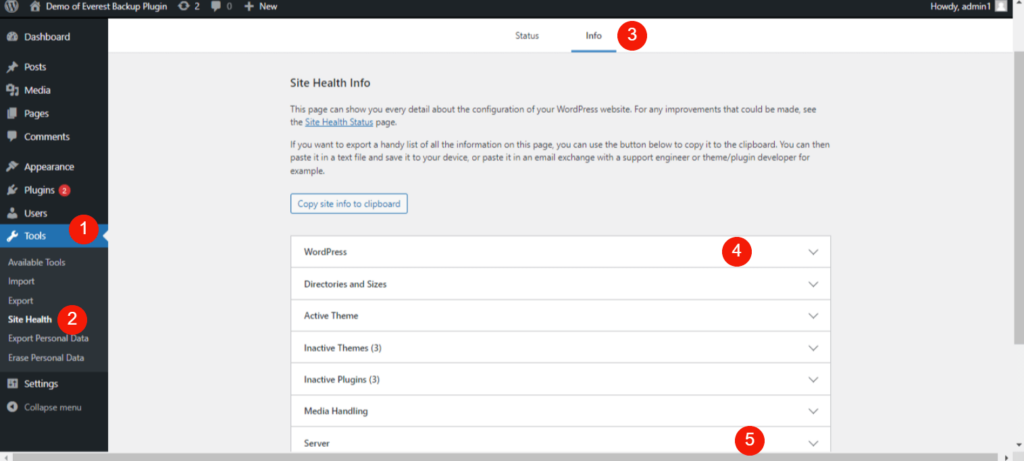
Step 1: Open your WordPress website Dashboard
Step 2: On your left, you will see Tools click on tools and go to Site Health
Step 3: Go to Info
Step 4: You will see the list of information on your WordPress website
Step 5: Click on WordPress and you will get the information about the WordPress version, time zone, and many more. And if you scroll a little bit then you can see Server, click and get the server information.
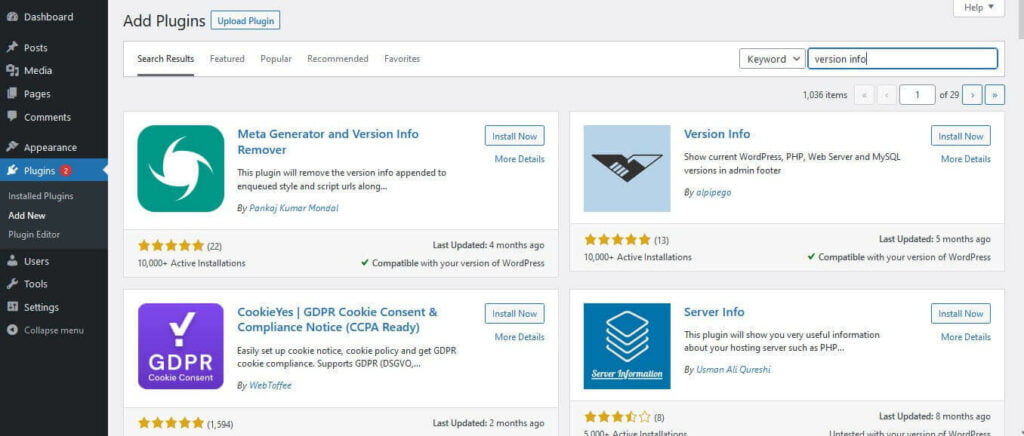
You can also install plugins that will show you the PHP version on the footer of your website.
Installing a WordPress Backup Plugin on your website
Let’s suppose, you find the best WordPress backup plugin suitable for your website. What next? Install and activate the plugin on your WordPress website. But the question is how to?
So let’s talk about
In general, all WordPress backup plugins are installed in this way but sometimes, after installing according to the given guidance also you can’t install the plugin at that time you need an expert to do that for you.
Furthermore, let’s discuss installing the WordPress backup plugin on your website
First of all Login into your WordPress website and enter into the dashboard.
Then on your left, you will see the Plugin menu and select “Add Plugin”. You might know or not in two ways you can install the plugin. One by uploading the file and another is by choosing the plugin from the search bar which you can see on the top right.
If you are going to upload the plugin then keep in your mind that the file that you upload must be in .zip format.
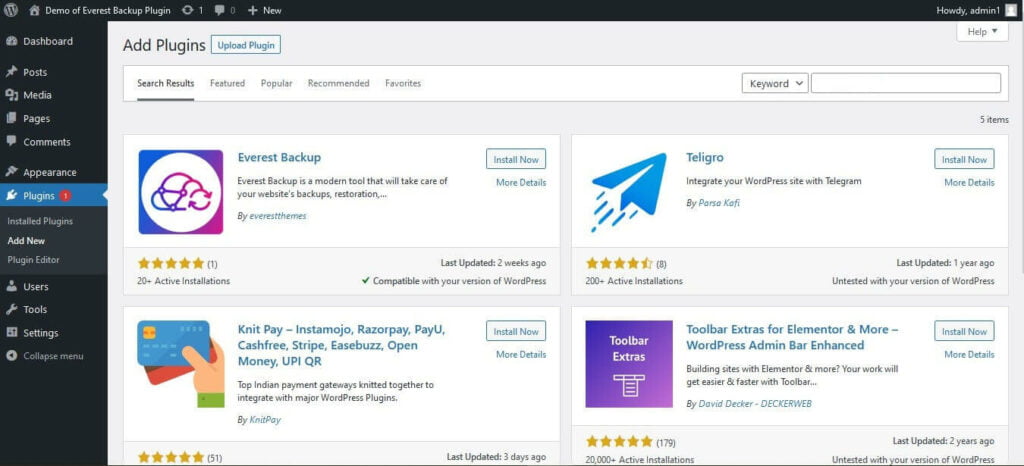
Better to search the plugin from the dashboard because it is an easy option. Search the plugin which you want and after a few seconds, you will find that plugin on the top left. Click on Install Now and wait for some time. If it is automatically activated then your plugin is successfully installed and activated otherwise click on the active button which will appear after installation is completed.
Once the plugin is installed and activated you can either see the plugin on the top navigation bar of the dashboard or on the sidebar.
How to take backup of the website using the WordPress Backup Plugin?
Let’s say you have installed and activated our Everest Backup Plugin. You will get two options to backup
- Manual backup
- Schedule backup
If you want to do it manually then
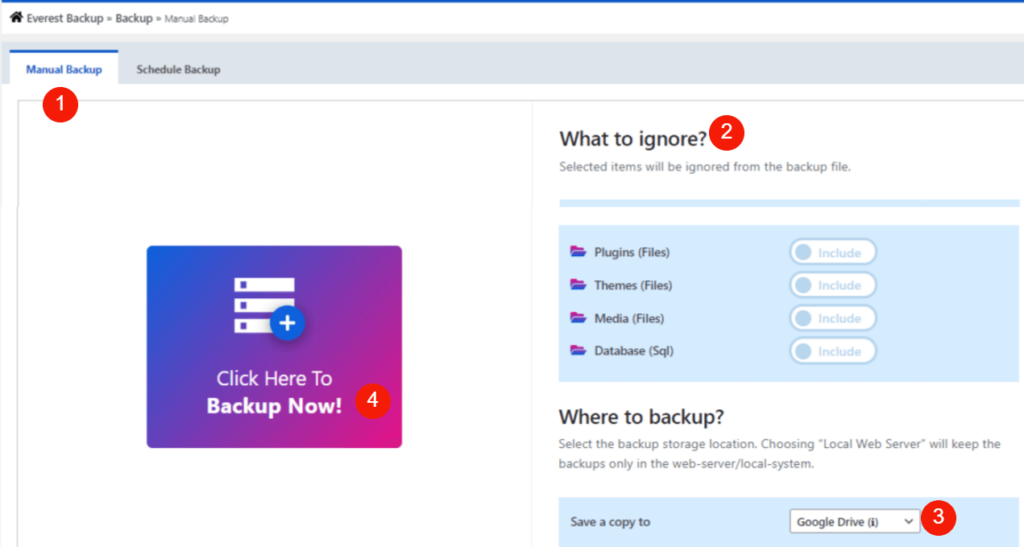
Now, go to “What to ignore?”If you want to ignore any of these files then click on the file. If not leave it as it is. Then, select the storage location by clicking on the dropdown.
If it doesn’t show apart from “LOCAL WEB SERVER” then go to Everest Backup Addons. For help read HOW TO ADD ADDONS IN THE EVEREST BACKUP PLUGIN?”
After that click on “Backup Now”. It takes a few seconds to complete depending upon your file size and internet speed. Since the backup is completed, you can now download the backup file or generate the migration key. Just below the Backup now button, you can see details. Click on the dropdown and you can see the Human Readable Log of the file which was recently backed up.
If you want to do it automatically/ schedule the backup then
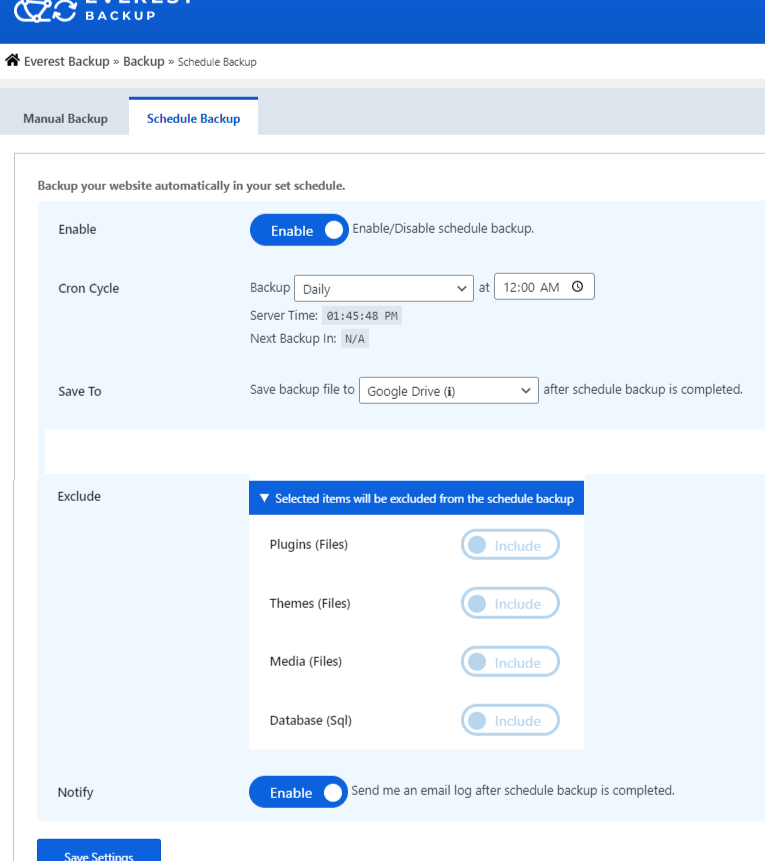
Click on the Schedule Backup tab then enable the Schedule Backup
Now,
Set the Cron Cycle to run periodically at a fixed time to backup.
Don’t be confused by Server Time below.
If it does not match your current time then you can change it to your location. After that select the storage location by clicking on the dropdown. Then if you want to ignore any of these files then click on the file. If not leave it as it is. Enable the notify. So that you will get an email log after the scheduled backup is completed. Save the settings.
Since you have done backup or schedule for the backup be relaxed. Now even if your website is hacked you will have all of your files back up with you. If you are going to do it manually then remember to backup the files after every change. And if schedule it then the system will backup according to the setting you set for.
Want to learn more about this WordPress backup plugin, you can visit our official website https://wpeverestbackup.com/. Or if you want any guidance regarding installing a plugin or backing up the website restoring or other features of this plugin then please visit Documentation. Here you will get both written and video tutorials ready for you. You can drop the message or mail us for any queries or errors at bug-report[at]wpeverestbackup. com.
Whatever you choose, choose wisely because you are going to invest your time and money in that WordPress Backup plugin for your website.
