You might think when there are two options of restoring by Upload Files and restoring from Available Files, why do we need to restore from the history tab of the Everest Backup Plugin?
There is no doubt you can restore from those options, but it won’t affect if you know another method to restore the files. And this is the additional feature of the Everest Backup Plugin which you can restore from the history. All WordPress restore plugins don’t have this feature which makes it a unique feature so better to know about this restore from the history tab feature of Everest Backup Plugin.
Not just we can restore from the history tab, but there are other features as you can remove and download those files from the Local Web Server or any other cloud servers. Just simple steps, the files are restored or downloaded or removed.
Table of contents
But why?Steps to restore from the history of the Everest Backup Plugin
What other features can we get in this History tab of the Everest Backup Plugin?
First thing first, Do you have Everest Backup Plugin installed on your WordPress website? If not then install Everest Backup Plugin now. And if the answer is yes then first check whether your WordPress website timezone is the same as your current location, if not, then change it.
But why?
Because if you change the timezone to your location then Server Time won’t confuse you and it will be easy to distinguish the newly backed up, restored, or migrated file. For more detail go to https://wpeverestbackup.com/blog/how-to-install-the-everest-backup-plugin/.
Furthermore, if you have installed Everest Backup Plugin but never took the backup of your website or any other features then you won’t find any files to restore from the history. You must have taken a backup or restored or migrated any other activities so that the activities will be stored in the history tab and you restore the necessary previous activity from the history.
If you don’t have time to take backup regularly then Everest Backup Plugin has an awesome feature for you that will ease your work and also take backup of your website from time to time. So that you will have the backup of your website. And that is Schedule Backup. With the help of Schedule backup, you can automatically have backups of your website for future use.
Since we have done some activities, now we will have files to restore from the history.
Steps to restore from the history of the Everest Backup Plugin
Step 1: Login into your WordPress website and open the Dashboard.
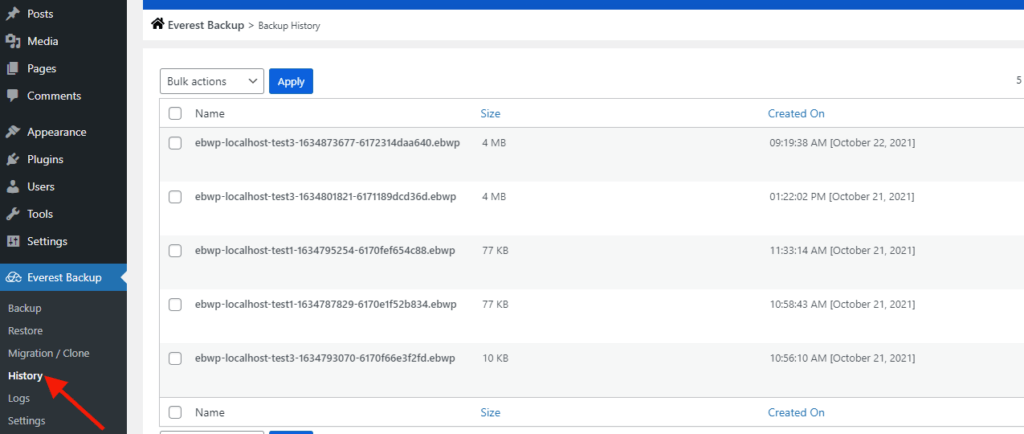
Step 2: On the left, you will see Everest Backup and then select History.
Step 3: In the history tab, you will get the list of files with their size and date of creation. Then choose one of them.

You can see the filter tab there from where you can choose the location like “Local Web Server”, “Google Drive”, or any other cloud server. But to choose from Addons apart from the Local Web Server, you have to install and activate the addons in your Everest Backup Plugin.
Before choosing the file check the details and then click.
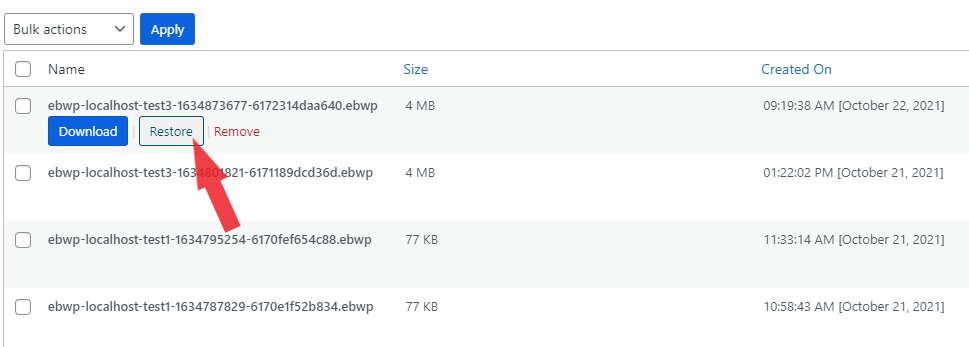
Step 4: Click on Restore.

You will be directed to confirm the file and if all ok then click on rollback to complete the restoration. It will take a few seconds to complete the action and once it is complete, you will be directed to the login page.
Step 5: Login into the dashboard using the username and password of the restored file.
Once it is logged in, you will be directed to the Everest Backup Plugin Log section, where you can see the Human Readable Log of the file by clicking on the dropdown.
For more details, watch: https://youtu.be/LpcYqR9Fcpk?list=PLJ9kDzVp2heF2Qa3Pfe2d8ZrOn60reYIt
What other features can we get in this History tab of the Everest Backup Plugin?
As I have already mentioned that we can remove and download the files which you can see on the history page.
Remove the file from the history tab:
If you want to remove the file then click on remove, a popup message will appear then click on ok. Then it will remove the file from the list.

Not just from the dashboard also remove the file from the drive, if you choose Google Drive or any cloud server category. That means you don’t have to go to worry about unnecessary files stored in Google Drive or other servers and directly remove the file from the dashboard.
In addition, if you delete the file from google drive and go to the dashboard and click on reset cache now, then the deleted file won’t be shown in the list.

Download the file from the history tab:
Simply click on download and it will download the file. Not just the file which is in the Local Web Server, also you can download the files which are backup in any cloud addons.
During this process (restore from history), if you get any kind of error message then send us an email at bug-report[at]wpeverestbackup. com with the screenshots of the error message, log file, and information about your system.
To get information on your system go to Everest Backup Plugin setting, select general, and then information.
