
WordPress Multisite Network feature allows you to use the same WordPress installation to operate many websites on your server. We’ll go over everything here, from setting up WordPress Multisite to optimizing its different features. We’ll also go over how to manually construct a WordPress multisite network, add a new site to the network, add plugins and themes, and some changes to the Everest Backup plugin after creating a multisite. You will be able to comprehend every aspect of this unique WordPress tool after reading this.
Table of contents
WordPress MultisiteWhy set up WordPress multisite network?
Who needs this?
Requirements for a WordPress multisite network
Creating the WordPress multisite network
- Step 1: Choosing a domain structure for your multisite network
- Step 2: Installing and Setting up your WordPress multisite network
Error messages appeared while uploading files?
WordPress Multisite
WordPress Multisite is a way of adding multiple sites to your WordPress installation from a single WordPress dashboard (using the same username and password). You can add to either your existing or newly-created WordPress site and can even allow other users to sign up and create their blogs on your domain.
It may also be used for a variety of things, like updating all of your websites with a single click or charging your members to construct a website on your WordPress Multisite Network.
You must add a few lines of code to a few files in your WordPress installation to enable WordPress Multisite Network, which we will discuss here briefly. Then you start putting together your website network. The existing site remains in place, with the same URL, while new sites will be created.
Why set up WordPress multisite network?
A WordPress multisite network can be more beneficial than managing many standalone WordPress sites in certain scenarios. Some of the benefits of using a WordPress multisite network are as follows:
- You can effortlessly administer many sites as the network administrator from a single dashboard.
- Each network site can have its administrator.
- The site administrators will only be able to manage their website.
- With a single download, you may install and activate plugins/themes for several sites.
- Rather than having to log in to each site individually, you can update all of your network sites with a single click.
Of course, WordPress Multisite has drawbacks that should be examined before determining if it’s good for you.
- Because all of the sites on the network share resources, if one goes down, all of the others may suffer as well.
- You must also ensure that you have a hosting plan that allows you to manage server resources and handle unexpected demands. This could result in a price rise for your site compared to what you’re used to.
- On a multisite network, some WordPress plugins may not perform properly.
When you wish to improve your workflow efficiency and administer several sites from a single account, however, WordPress Multisite is a practical and powerful solution. You can also set one up in just a few simple steps.
Who needs this?

Not everyone needs to use Multisite, everyone doesn’t need to use it. Some are using this unnecessarily so that if one site is hacked then all of their sites are hacked. So Multisite is not for all users. It’s not that there are some specific people or sectors who can only use it, everyone can use it but why to use it unnecessarily.
Here are some circumstances in which a multisite network is required:
- A magazine website with many sections overseen by various teams.
- A corporate website with subsites for various locations and branches.
- WordPress multisite can be used for numerous departments, locations, and regions for government or non-profit websites.
- You can create your blog network with multiple subdomains.
- On school servers, schools and institutions allow students to build their blogs.
Requirements for a WordPress multisite network
You must have chosen whether Multisite is the correct solution for you after reviewing the technical advantages and disadvantages. If you want to use it, you’ll have to first meet a few technical prerequisites.
- WordPress hosting and domain names that work
- Make a copy of all of your databases and files.
- Deactivate all the WordPress plugins before creating the multisite network
- Activate pretty permalinks ( the URL must look like https://wpeverestbackup.com/blog
- FTP access to WordPress installation
Creating the WordPress multisite network
Follow these steps to create the WordPress multisite network manually :
Step 1: Choosing a domain structure for your multisite network
You can add new sites to a WordPress multisite network by using subdomains or subdirectories.
For instance, http://everest1.example.com and http://example.com/everest1/ are both valid URLs.
If you choose subdomains, your server will need to be configured with wildcard subdomains. You don’t need to set up wildcard subdomains if you don’t want to.
Configure wildcard subdomains
If you decide to use subdomains for websites on your multisite network, then you will need to set up wildcard subdomains for your multisite network.
To create a wildcard subdomain:
1. Log into your cPanel.
2. Navigate to the Domains section > Subdomains menu.
3. Create a subdomain * that points to the required folder (the path must be specified in the Document Root field):
4. Select the Zone Editor option from the menu.
5. Verify that an A record for *.yourdomain.com has been established and linked to the server’s IP address.
6. Now you must wait for the propagation to complete before the wildcard subdomain will function properly.
Step 2: Installing and Setting up your WordPress multisite network
- Enable the WordPress multisite feature
To enable Multisite, connect to your site using an FTP client or cPanel file manager, and open the wp-config.php file for editing.
If you have a Mac device please manage your file.
Now add the following code to your wp-config.php file above ‘ /* That’s all, stop editing! Happy publishing. */
/* Multisite */
define (‘WP_ALLOW_MULTISITE’, true);
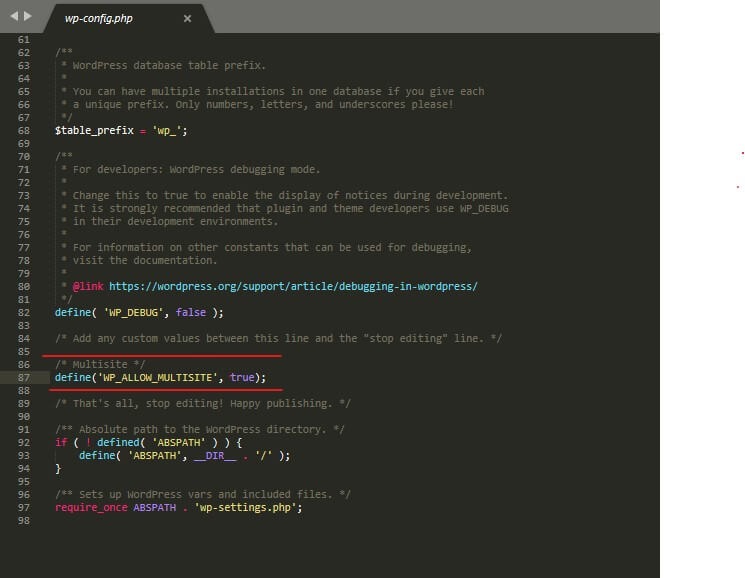
The purpose of this code is to enable the multisite features on your WordPress website. Once you are done don’t forget to save it. Then upload your wp-config.php file back to the server.
- Install your WordPress multisite network
If you are setting up an existing WordPress website then deactivate all the plugins of your site. But if you are creating a new one then no need to deactivate any plugins (there won’t be any plugins in the beginning).
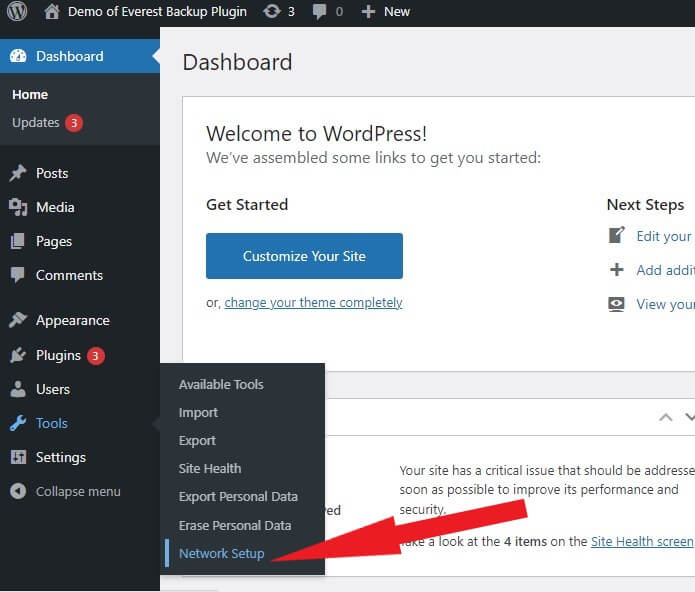
Now go to Tools and choose Network setup to configure the multisite network.
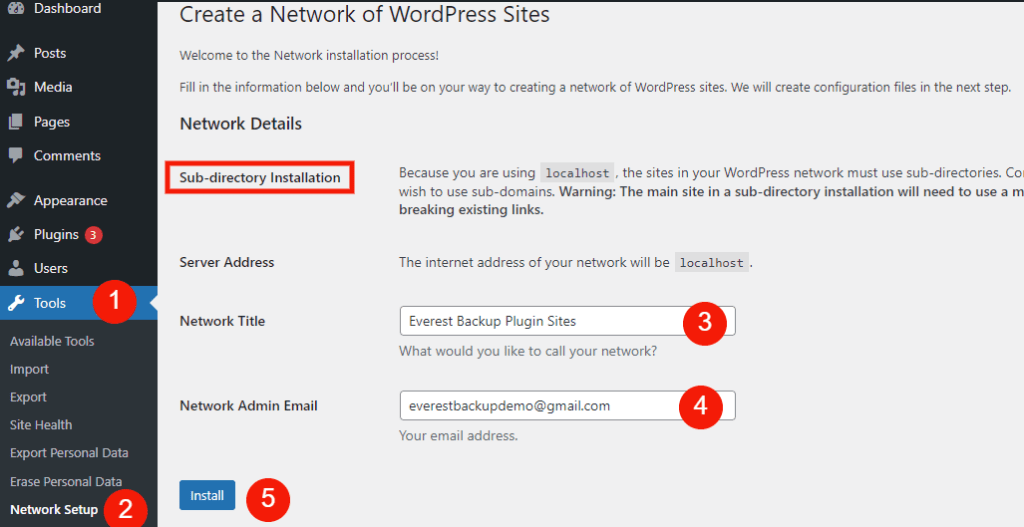
Now choose which domain structure you want to use either Subdomains or Sub-directories. Then set the Network Title and Network Admin Email. After that click on install.
- Add code snippets to your WordPress files
Wait for some time and WordPress will show some code that you need to add to the wp-config.php and .htaccess file respectively.
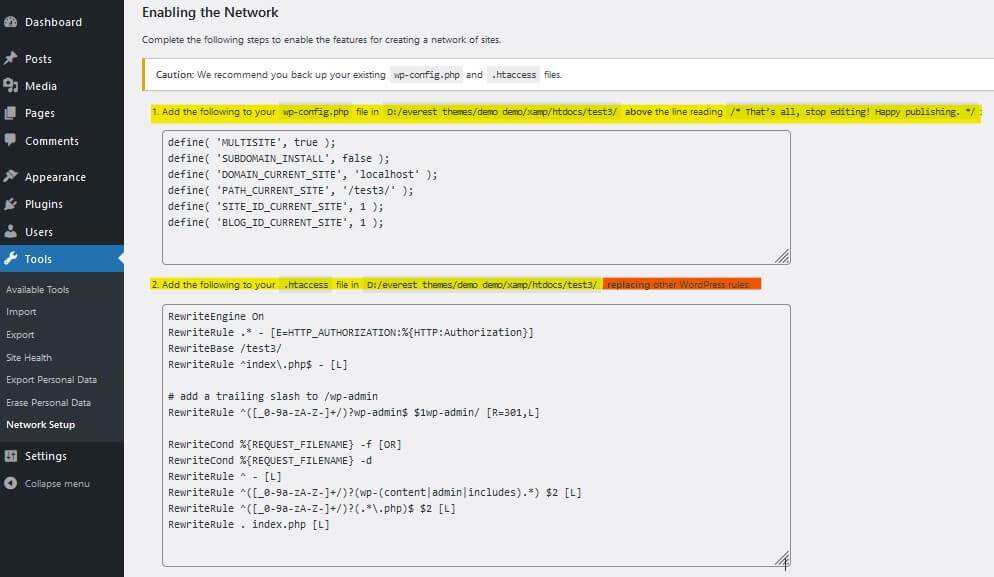
After inserting the code in the respective files you need to re-login the WordPress site to access the multisite network.
- Configure your network settings
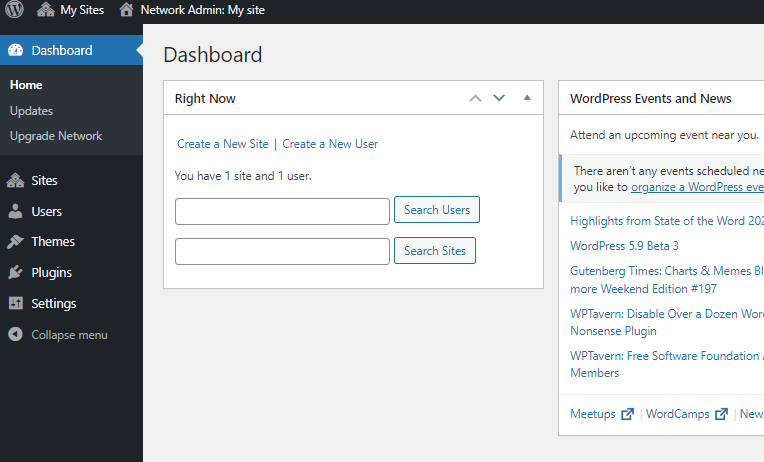
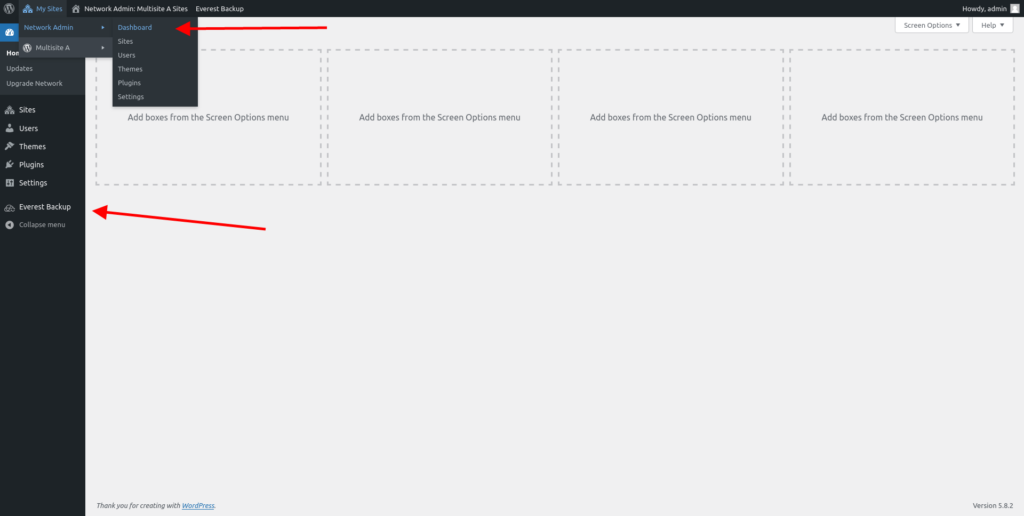
After login, you need to switch to the ‘Network Dashboard’ to change network settings, add new sites, and configure other settings.
Hover around My Sites, you will get a dropdown click on Network Admin, and go to the dashboard.
Now you will be directed to the multisite network dashboard. There you can see new menu items, and a “Right Now” dashboard widget that allows you to create a new site and add new users.
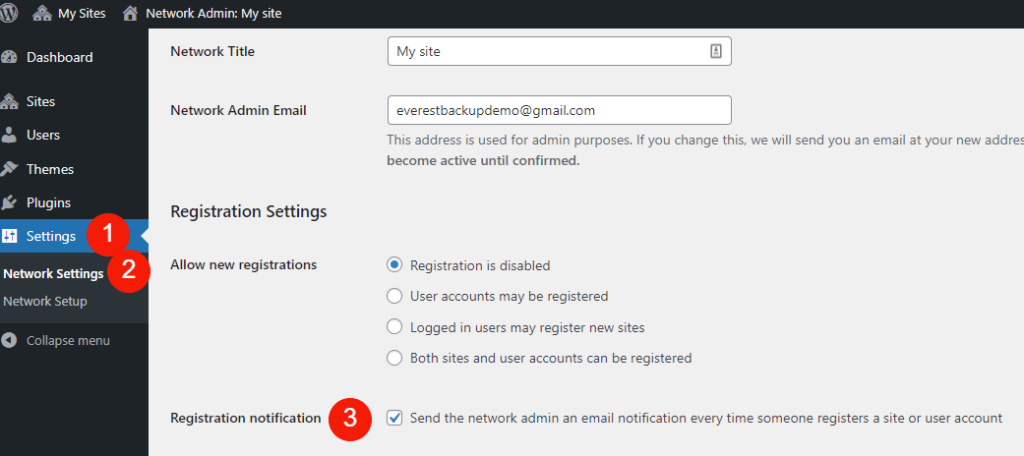
Go to settings, which you can see on the left below the side navigation menu bar. No need to fill the Network Title and Network Admin Email because the Network Title and Network Admin Email will be automatically filled with the network title and the admin email you entered during setup.
The most important part is Network Registration, by default, both user and site registrations are disabled on the network. So you can choose to open your site for user registration or allow existing users to create a new site or both user and site registration.
To receive email notifications whenever a new user or site is registered, check the box next to the ‘Registration Notification’ option.
Check the box next to the ‘Add Users’ option.
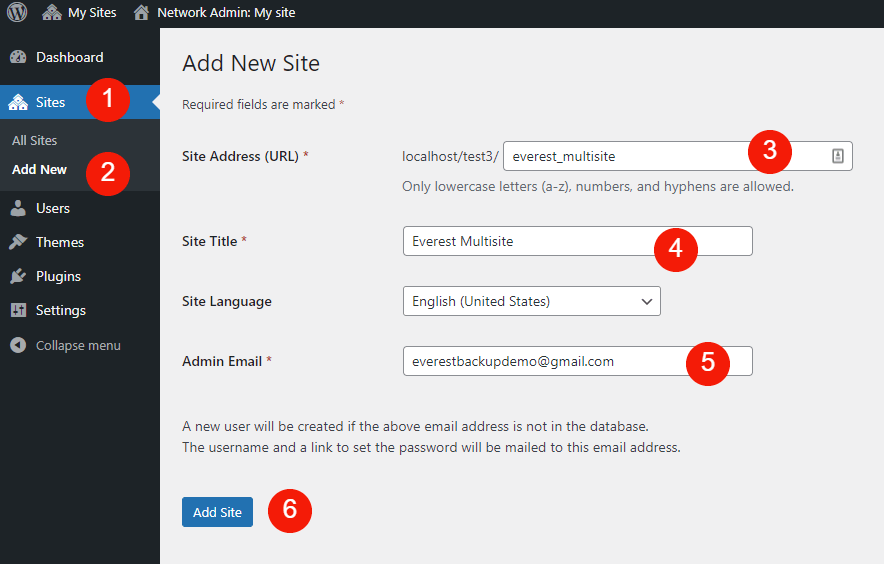
- Add a new site to your network
To create a new site click on Add New. Fill in the information and click on Add Site. Then you can edit the site config to add additional information like the users, themes, and settings for the site.
- Install plugins and themes on your multisite network
To install plugins and themes on the multisite network go to settings and click on Network settings. There you will see To install plugins and themes on the multisite network go to settings and click on Network settings. Enable administration menus can be found there. To enable Plugins, check the box and save the settings. You can now install the plugin:
Network Admin>>Plugins >>Installed Plugins >>Add New.
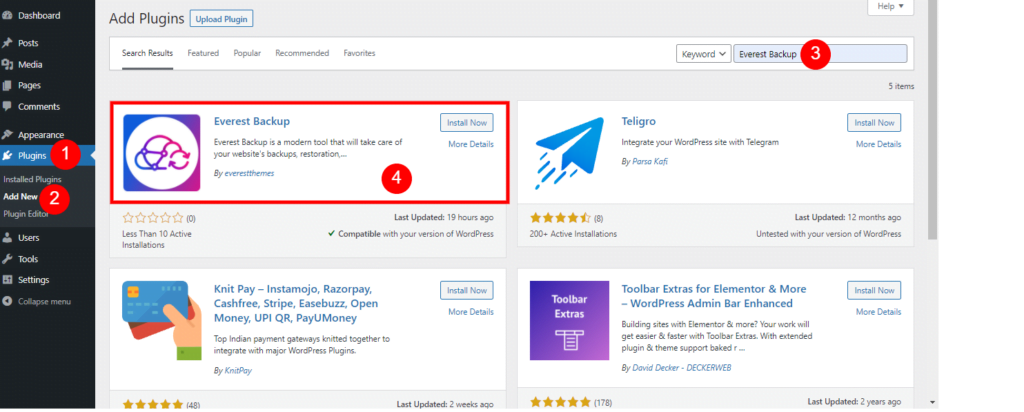
The installation process is the same as installing the plugins in your WordPress website before a multisite network is created. Still confuse then https://wpeverestbackup.com/blog/how-to-install-the-everest-backup-plugin/
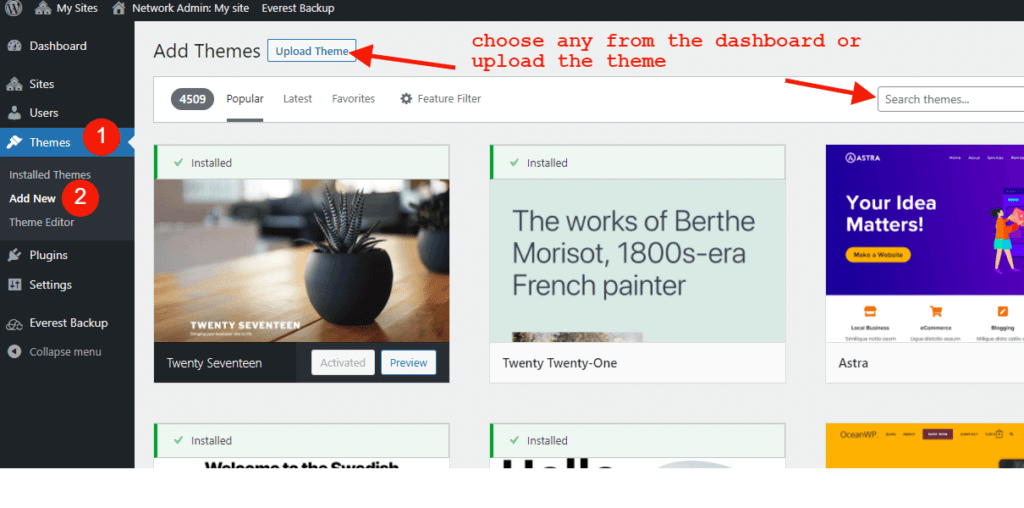
To add themes:
Network Admin >> Themes>> Installed Themes >> Add New
Manage WordPress websites using Everest Backup Plugin Multisite feature
After creating the Multisite Network in our WordPress website login into the dashboard. You will see some changes After creating the Multisite Network on our WordPress website login into the dashboard. You will see some changes in your dashboard now. Previously you will see my dashboard but now you will see ‘My Sites’ (the network name which you set before creating a Multisite network). Hover around my site, you will get two options Network Admin and Multisite A ( a new site name). If you have already installed any plugin like our Everest Backup Plugin then you can see the plugin in the menu bar.
Error messages appeared while uploading files?
Usually, the plugin will function without an error but sometimes while uploading files to restore or rollback or cloning, you might get some errors in server space and upload file size. Then what to do? Do you need to contact your hosting server or what? This might be your question. Not to worry.
Just go to the settings of the menu bar in the dashboard and click on Network settings. Scroll down a little bit and you will see Upload settings and set the site upload space and Max upload file size according to your server. Let’s say we set 900 MB for site upload space and 90000 KB at Max upload file size. Then save the settings.
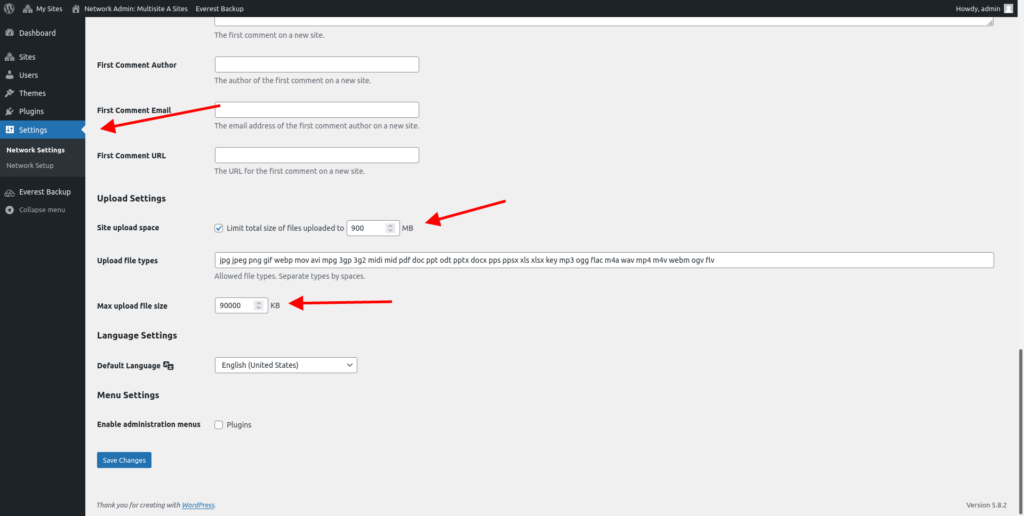
Now you won’t get an error message while restoring the files by uploading or during migration/clone. But also if you get any kind of error messages while creating WordPress Multisite then send us an email at bug-report[at]wpeverestbackup. com with the screenshots of the error message, log file, and information about your system. To get information on your system go to Everest Backup Plugin setting, select general, and then information.