
One of the most crucial website care measures is backing up your website. However, there are several ways to build a WordPress backup, and deciding which one is the best method isn’t always easy.
That’s why we will discuss different ways to backup your WordPress website files. After reading till the end of this blog, you’ll be able to find the method that’s ideal for you by investigating all of the options.
Table of contents
Why to backup the WordPress files?What to backup
How often should WordPress sites be backed up
The best way to create WordPress backups
- 1. Backup through your hosting provider
- 2. Backup WordPress manually
- 3. Backup with a plugin, why not just backup all the files and databases everytime
Schedule Backup
Where to store the backed-up file
Furthermore, we’ll look at why every WordPress site should have at least one backup option and where to store the backup files.
Why backup the WordPress files?
You might think why backup the files when you have a highly secured WordPress website with antivirus-protected plugins. It is a common question and everyone asks this. And it is obvious without any benefit why to pay for some unnecessary plugins and install that might give load to the website.
If you are thinking like this and you don’t install a backup plugin on your website then how will you restore if anything bad happen to your website. Like somebody hacks your website and deletes all the files and you don’t have the backup, what to do then? Or a virus attack and your website not working. For all these questions backing up before all these happen is just a solution. Otherwise, you have to pay again for the same thing again and again.
Backing you the WordPress files not just saves you from the damage of hacking or fraud, it also saves your money from redoing the same shit again. So why not install a WordPress backup plugin for your WordPress website.
What to backup
Talking about backing up, WordPress suggests taking backup of everything that includes the site databases and its files. Backups will be made of all linked plugin and theme files, code files, media, and static web pages. This is where your site’s content is stored in your database. If you make a backup, you’ll be able to restore your website with all of your posts, links, and comments intact.
Your WordPress site has three kinds of files and one database.
- Core WordPress Files
- Files in your theme, plugins, and uploads
- WordPress configuration files
- Your WordPress Database
And if you don’t want to lose anything then you must backup all the files. Yes, it will consume your disk space or cloud space so you can backup the whole thing at first, and then for the next backup you backup those files which have been updated recently.
How often should WordPress sites be backed up
No one can say how often you should backup your site because if there is any change of your site once a week then it is ok to take backup once a week after the change takes place. No need to take backup daily because if you take backup daily then it will just cover the space of the place where you store. But if there is a daily change in your site then you must backup daily so that you won’t lose any files or data. In this case, if you take backup once a week then if anything wrong happens before you take backup you will lose the files.

So, backing up the site depends upon the type of website or in simple form depending upon the changes that take place in the website. But WordPress recommends taking backup twice a week.
The best way to create WordPress backups
Mainly there are two basic types of backup one is a database only and another is a whole website backup. And there are 3 best ways to create a backup of your WordPress website.
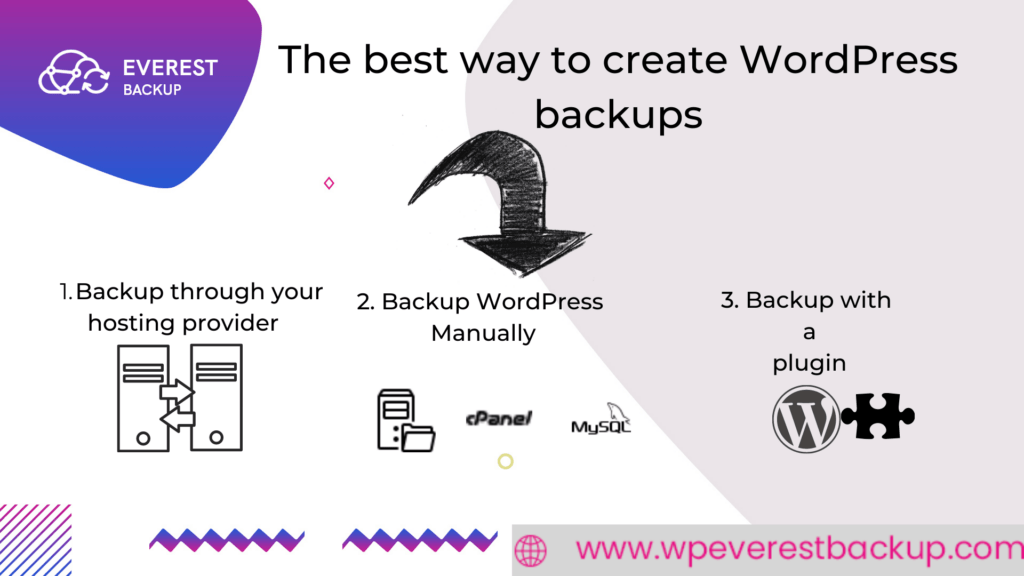
1. Backup through your hosting provider
The first place where we can get our website backup is the hosting company. If we lose any file or are hacked then we can consult with the hosting company from where we have hosted our website for backups.
While this is helpful but is most likely insufficient.
After all, if your server goes down, you’ll need a new location to access your backup files right away. And backing up files in the Local Web Server might be one of the biggest mistakes.
2. Backup WordPress manually
Another method to backup our WordPress website is to backup the WordPress website files manually. Yes, it is a kind of tedious job to do but we need to take a backup of the website so that we won’t be in trouble. We can backup files in three ways using the FTP method, CPanel method, and PHPMyAdmin to backup the database.
2.1 Backup WordPress files using the FTP method
Backing up the WordPress files using the FTP method is an option for users who do not have or cannot access cPanel. This technique is a little more complicated because you’ll require FTP clients. Let’s discuss how you can backup WordPress files step-by-step:
- Open a file transfer protocol (FTP) client.
- Open your favourite FTP client. To connect your local site to the remote site, enter your credentials in the FTP software.
- In the right panel, navigate the file directory once FTP has connected to the remote server. For your site, look in the public HTML directory for the file public HTML.
- Select Download from the context menu of that folder to have it copied into your local system folder. You can also download folders by dragging and dropping them from the right panel to the left panel.
- ZIP Keep your downloaded files in an archive and store them safely.
2.2 Backup WordPress files using the cPanel method
Many web servers employ cPanel to securely manage and back up the WordPress site using a simple interface. This backup method is the most complicated of all the usual backup procedures, but it’s still doable.
- To begin, log into your hosting account’s backend.
- To access the File Manager in cPanel, go to:
- After clicking (but not accessing) the public HTML folder, select Compress from the toolbar:
- You’ll be prompted to choose a compression format and give your file a name in a dialog box. Compress File(s): Zip Archive and then Compress File(s): Zip Archive are the two options.
- Finally, choose the ZIP file in File Manager and click Download from the toolbar.
- This will download the file to your machine, after which the server copy should be deleted.
By this method, you will backup all the files except the database so to back up the database you need to backup from PHPMyAdmin.
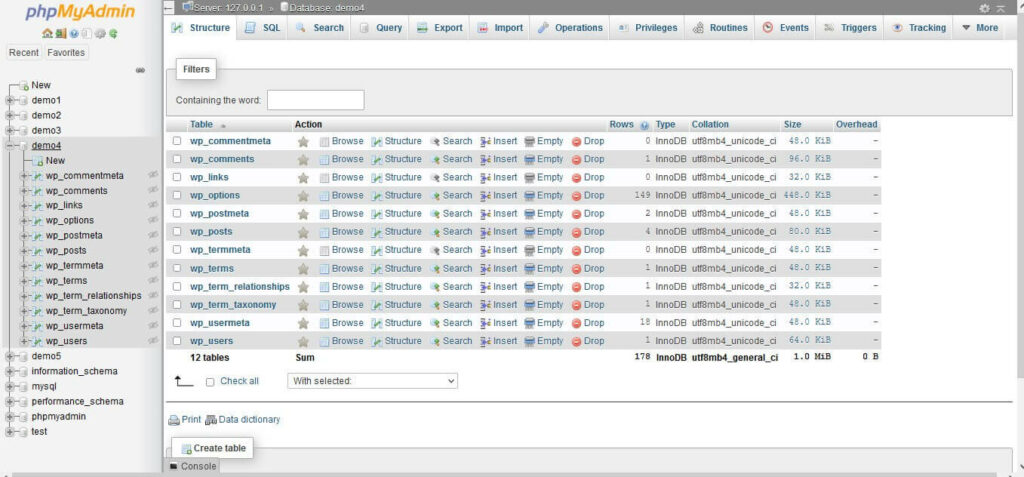
2.3 Backup the WordPress database using PHPMyAdmin
After we backup other files from the cPanel, now we backup the databases of the WordPress website which is also an important file to be backed up.
- Now return back to your cPanel dashboard and check phpMyAdmin: to see if this has been saved as well.
- You’ll find a list of your websites in the left-hand directory. Click on the database for your website, check all of the ‘tables’ within, and then go to the Export tab:
- While there are other options on this screen, choosing the Quick Export technique and the SQL format will suffice. Press the Start button when you’re ready:
- The file should now begin to download. If the backup appears in phpMyAdmin, just copy the data into a new text file and save it with the.sql extension using your favourite text editor.
3. Backup with a plugin, why not just backup all the files and databases every time
Don’t you think the above methods are quite confusing and don’t you think an expert help is needed to back up the file? So here is the simple way which will backup all the files including databases with a single click. And the amazing thing is you don’t need an expert to do that.
Install a backup plugin into your WordPress website and backup the files. But before installing the backup plugin check whether it backups all the files or just the database.
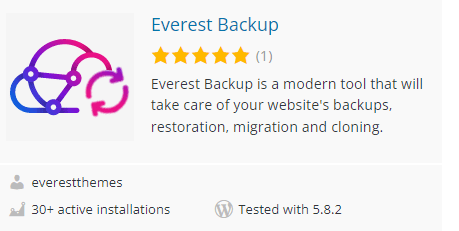
Wondering which one to choose? Obviously, you will see many WordPress backup plugins on wordpress.org which can confuse us. So why be confused choose Everest Backup Plugin.
Everest Backup is a modern tool that will take care of your website’s backups, restoration, migration, and cloning. It is the fastest and most easy-to-use cloud-based storage backup plugin. In a few clicks connect your Google Drive and Schedule your backup. Everest Backup has manual as well as automatic scheduled backup and pushes them to your Google Drive and restores them with a single click.
Features of Everest Backup Plugin
- Easy-to-use: Enroll in a simple interface that allows you to backup and restore your data with a single click on a timetable that works for you.
- Client Trusted: Everest Backup is tested in more scenarios, installed on more servers, and rated higher than any other competitors.
- Comprehensive: Everest Backup is a complete, general-purpose backup and restores plugin with a unique feature, Human readable logs.
- Cloning and migration: Simply copy and paste the magic link to another domain and migrate within a minute.
- Fast, personal support: Provides expert help and support from the developers whenever you are in need.
- Network / multisite: Besides standard single sites, Everest Backup supports multisite network backup & migration.
- Backup time and scheduling: Set the time to backup, restore, or delete the data and let the system do the job.
- Additional benefits: You will get all the premium features in the pro version of Everest Backup Plugin
Why not to install Everest Backup Plugin in your website to backup the files?
Do you know that you can backup files in two ways one is manually and another is automatic? Both backup methods are best because you can choose what to backup and backup in a local webserver or any cloud server, whereas you can choose file, storage location, and set the time, and according to the time you set the system will back up the files.
Let’s discuss this briefly
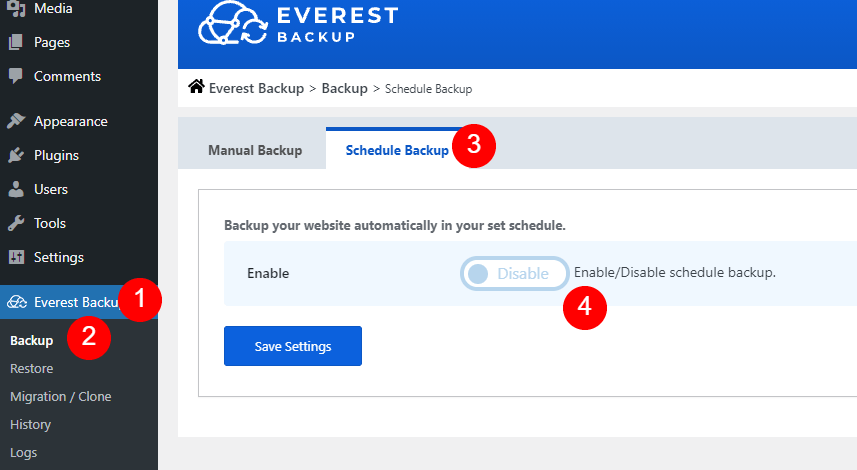
Once you login into your WordPress website dashboard, on your left you can see the Everest Backup Plugin menu and click on it. Then you will get two options as I mentioned above.
Manual Backup
Schedule Backup
Manual Backup
Step 1: By default, we select the entire file which is shown in “What to backup?”.
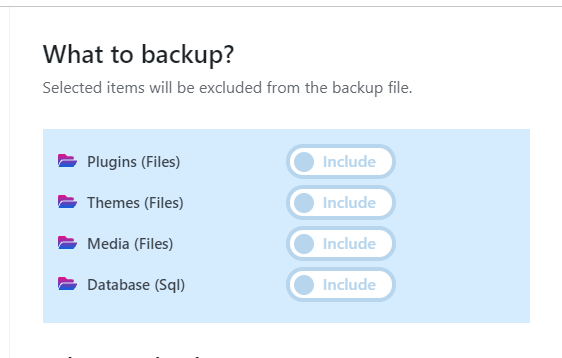
Step 2: You can ignore which file you don’t want to back up, for that, select what not to backup (plugins, themes, media, or database).
Step 3: Choose the server where to store the backup file. In the beginning, you will see “Local Web Server” to store your backup file. So click on the dropdown and you will get other server options like Google Drive. So you can select any of them to store the backed-up file.
If Google Drive is not installed then here is a tutorial “Everest Backup Google Drive“.
You can also add other cloud addons and to know how to do that go to “Add Cloud Addons“.
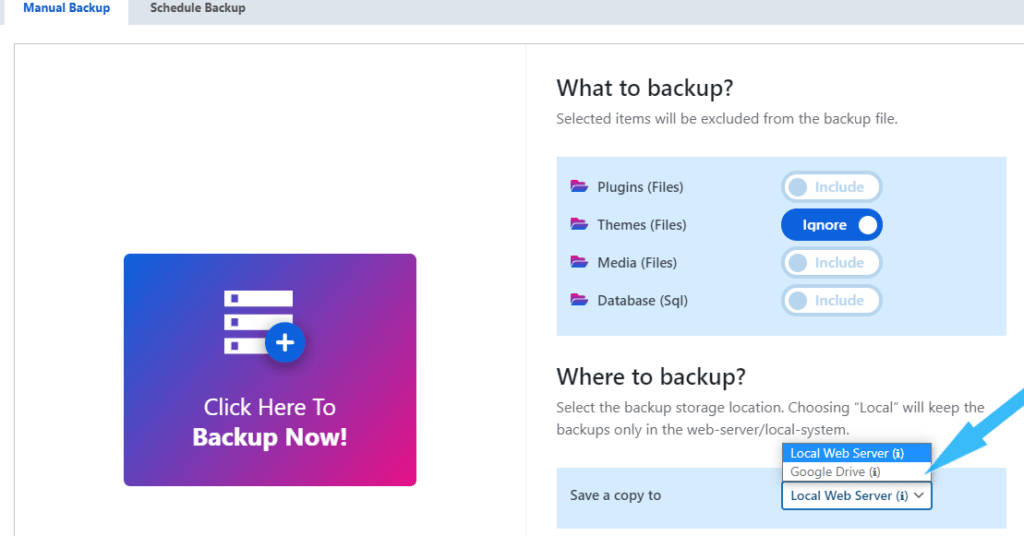
Step 4: Click on backup now.
Step 5: Click on download.
It takes a few seconds to download and the time taken will depend on your file size and the Internet Speed. After completion, a popup dialogue box will appear from where you can Download the File and Generate a Migration Key to migrate the file from one website to another or one server to another.
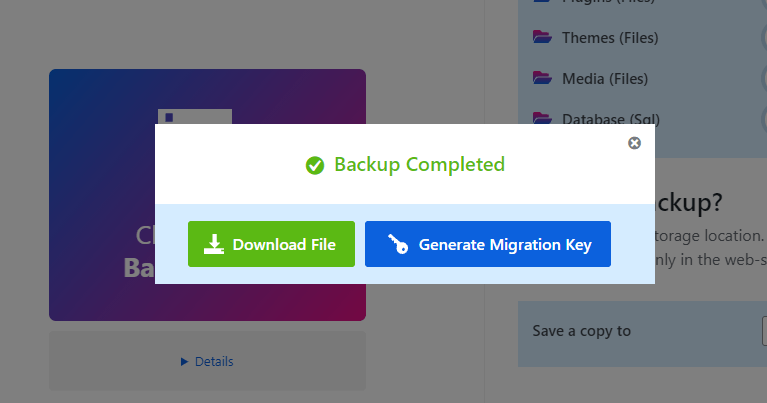
You can click on “Details” to get information about at what time your backup started, disk size, when the backup was completed, how much time it took to backup, the size of your backup file, and the status of whether your file is backup or not. With the help of this Human Readable Log, you will know what is happening back on your website.
Or you can go to the History tab of Everest Backup Plugin where you will see the list of files with their size and date of creation.
Schedule Backup
First, enable the scheduled backup, by default it will be disabled.
Step 1: Set the Cron Cycle to run periodically at a fixed time to backup.
Step 2: Choose the server to save the backup file.
By default, you will get the “Local Web Server” option to save your file but we don’t recommend you to save your backup file there. Because if your local server crash then all your data will be destroyed. So store in Google Drive or any other cloud addons.
If Google Drive is not installed then here is a tutorial “Everest Backup Google Drive“.
You can also add other cloud addons and to know how to do that go to “Add Cloud Addons“.
Step 3: Select what to backup( plugins, themes, media, and database).
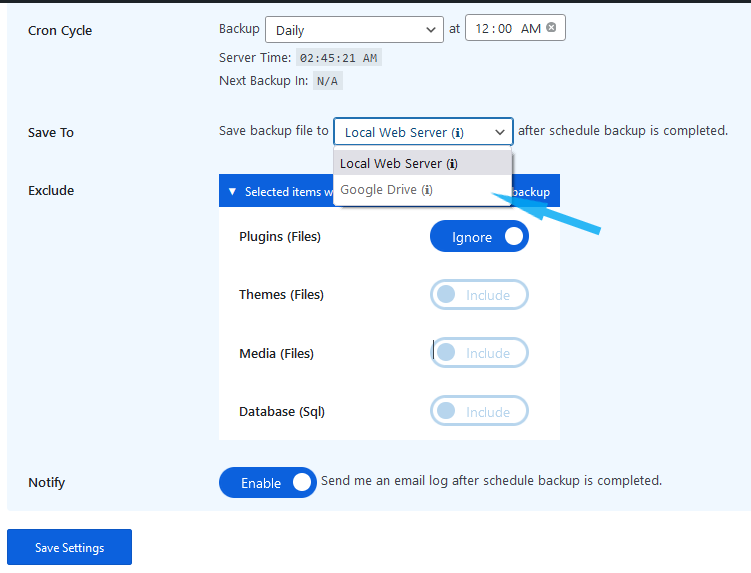
Step 4: Enable Notify so that you will get an email log once the scheduled backup is complete. If you don’t enable the email, it won’t send you a status email. So better enable it.
Step 5: Save the setting
According to the time you have set, location, and selected items will be backup. You will be notified once it is completed. Now no need to worry about any data fraud, hacking, server faults, or other reasons. Furthermore, having a complete backup of your website, including files and databases, will save you from losing years of hard work.
Where to store the backed-up file
Storing the backed-up files in the Local Web Server can be a dumb idea to do that. Because
- The server might crash.
- Need to carry your device if you need to transfer a backup from one server to another.
- The files can be misplaced.
- The files can be rewrite
So better to store them in a safe place from where you can get the files easily, no need to carry the device, no risk of a server crash, no misplaced file, and no rewrite without your concern. Yes, I am talking about storing files in the cloud server. And while talking about cloud servers, always Google Drive comes first to our mind.

Google Drive is one of Everest Backup’s most popular cloud storage and Google’s prominent online repositories. The benefit of backing up your WordPress website in Google Drive are:
- You can take advantage of an unpaid Google Drive repository with a current storage capacity of 15 GB.
- All of your files, including the backup of your WordPress website, are always and everywhere accessible.
- If additional storage is required, you can easily buy an extra Google Drive repository.
For more details visit “Everest Backup Google Drive“. You can get a step-by-step tutorial as well as the video tutorial here. Need any help or have any kind of queries then mail us at bug-report[at]wpeverestbackup. com.